How to use HubSpot Private App to generate HubSpot access token?
Hi, hope you are doing well. Thank you so much for stopping by. It’s another day to learn something fruitful. To give you an idea of what we will be learning here. The guide will help you create a Private App in Hubspot and generate access tokens using that private app. Lastly testing the Hubspot Access Token by making Hubspot Contact API call using a simple python code. Through this guide, I will answer your questions like permission needed to create a private app. What is HubSpot? Why do we need to create a private app? How to use the access token generated from the app to make HubSpot API call?
What is HubSpot?
HubSpot is an American developer and marketer of software products for inbound marketing, sales, and customer service. Its products and services aim to provide tools for customer relationship management, social media marketing, content management, lead generation, web analytics, search engine optimization, live chat, and customer support.
Hubspot offers a lot of products and services, but it is commonly known for CRM services. Hubspot CRM comes in very handy for scaling businesses, which connects everything scaling companies need to deliver a best-in-class customer experience in one place.
What is the HubSpot API?
The HubSpot API is built to allow you to create a functional application or integration quickly and easily. HubSpot has several APIs to cover almost all possible client’s and developer’s needs.
What is HubSpot Private App?
Private apps allow you to use HubSpot’s APIs to access specific data from your HubSpot account. You can authorize what each private app can request or change in your account, which will generate an access token that’s unique to your app. You can install a private app only on one HubSpot account (as the name suggests). To create and access a private app you need to be a super admin of a HubSpot account.
Note: Apart from private apps you can create public apps, public apps allow you to set up custom timeline events or webhooks. Also access token generated using a public app is through the process known as OAuth token generation and here access token has an expiry providing extra security. To know more go to how to set up the HubSpot public app and generate an access token.

Okay, so now let’s dive directly into the main topic!
Create a HubSpot Private App
1. Navigate to the Private App section of HubSpot
In this step, we will navigate to the point from where we will be able to start the creation of a private app. To start with first login to your Hubspot Account. Once you are logged in to your HubSpot account you will see the below screen.

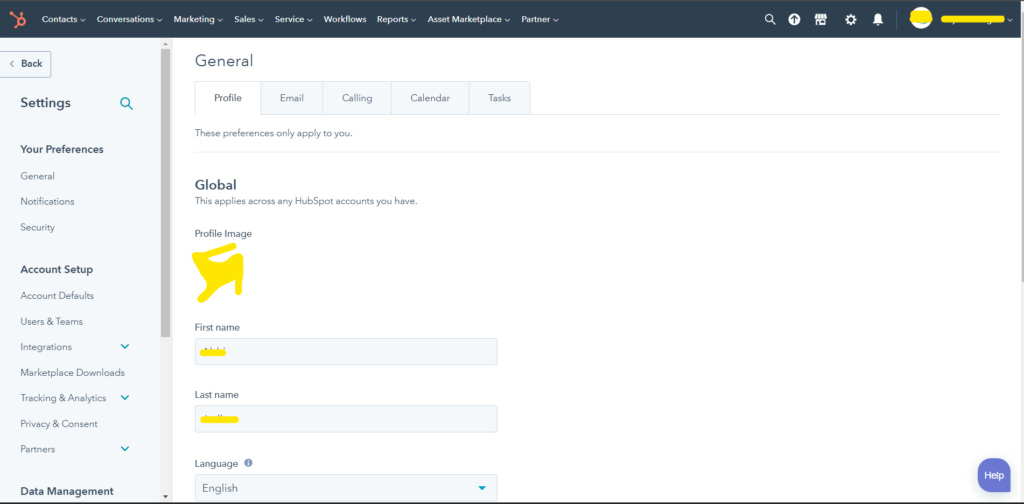
Assuming you are successfully logged in. Next, you need to click on the “Settings” button. You will find it in the top right corner of your screen. If you focus on the above image I am using the green arrow to pinpoint it.
After clicking on settings you will be directed to the settings page which will have a bunch of options and your screen will look like the image below.
Ignore the weird-looking yellow design I have drawn in an attempt to hide my HubSpot account logo!
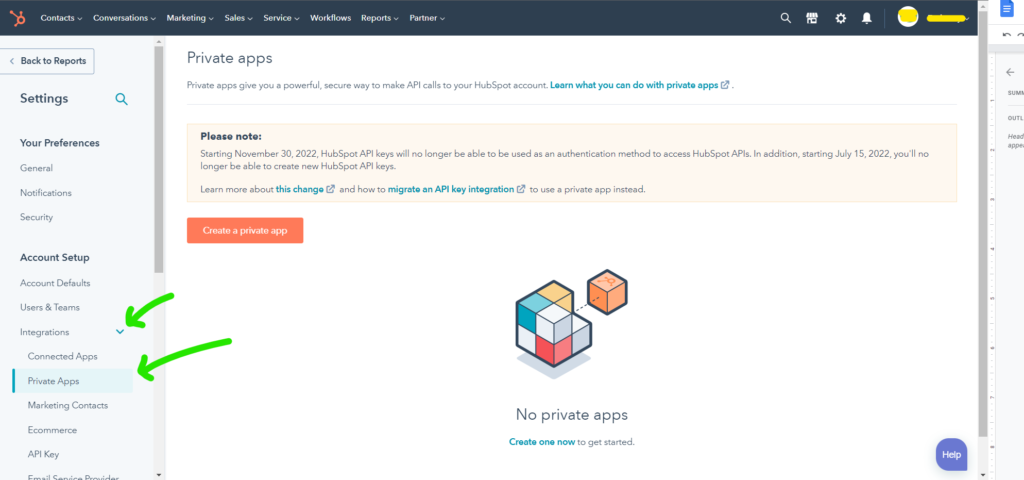
So, hoping your screen is as above image. Next, you need to click on the “Integration” option, in the left-side menu. On click it will expand, giving you a bunch of operation options. For our objective, you need to click on the “Private App” option.
After following the above step you should see the Private App titled section on your screen. If your HubSpot account doesn’t have any private apps, your screen will look like the image below.
2. Create a HubSpot Private App
In this step, we will follow the process and steps of creating a HubSpot private app. Assuming your screen looks like the above image i.e you have followed all the prior steps successfully. Now to start creating the app you need to click on the “Create A private app” button shown in the image below.

On clicking the above button you will get redirected to a page that should look like the image below.
Now you need to give your HubSpot private app a name, logo (optional), and description (optional). In my case, I am going to set the name only and that will be “Demo App”.
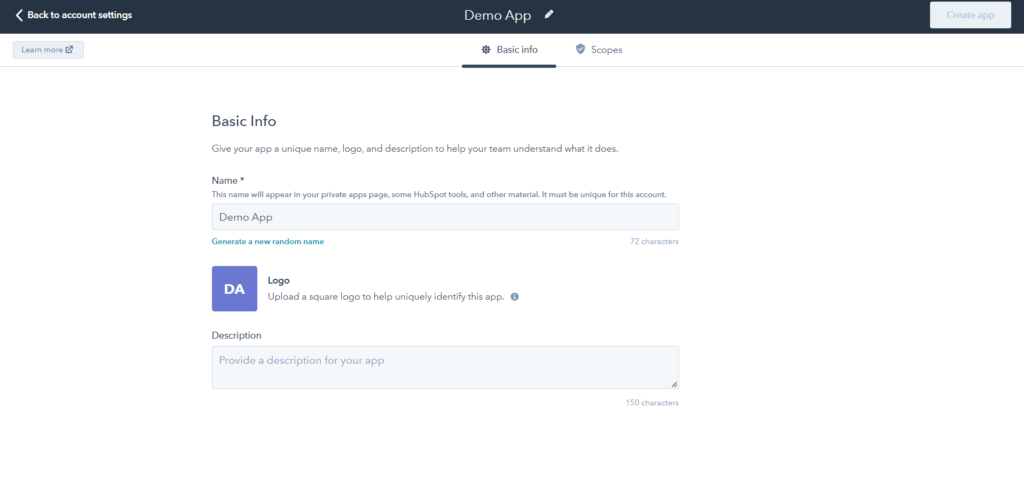
In case you are wondering why the “Create app” button in the top right corner is disabled. The button will be enabled only after you add scopes to your HubSpot private app.
To add scope click on the “Scopes” option on the side of Basic Info in the top center of the screen.
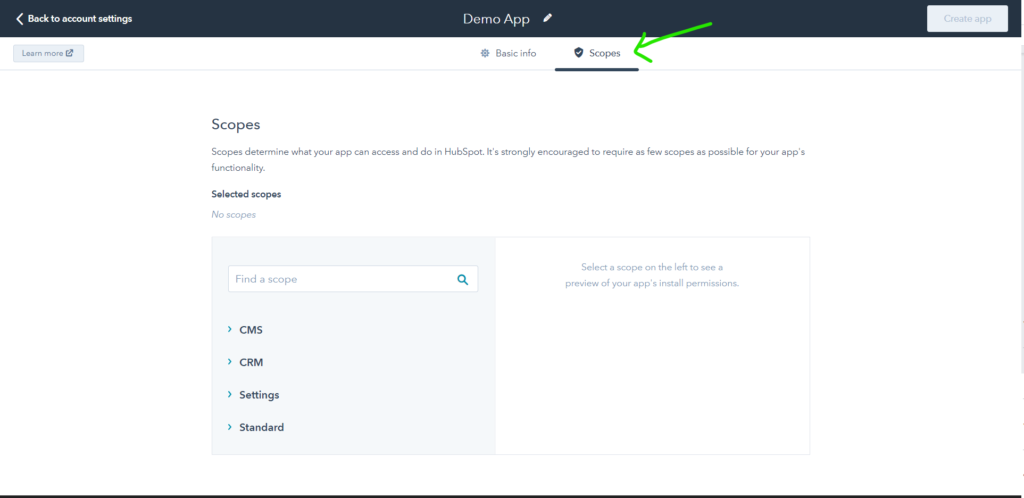
Next, add the scope as per your requirements. In my case, since we will make a HubSpot Contact API call to extract the contacts list from the HubSpot account I am going to add crm.objects.contacts.read scope having read access.
You are all set to create the app after you have added some scope to the HubSpot private app. Next, you need to click on the “Create app” button, present on the top right corner of the screen as shown in the image below to complete the creation process.

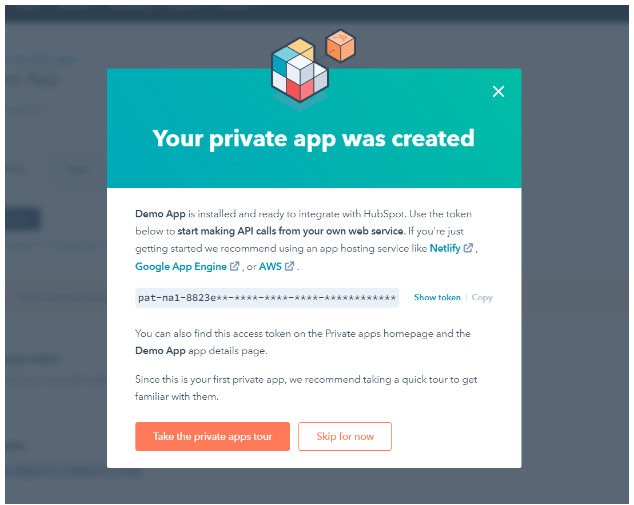
Next, confirm the creation of the HubSpot private app, and you will see a popup with confirmation of the creation of the private app along with an access token.
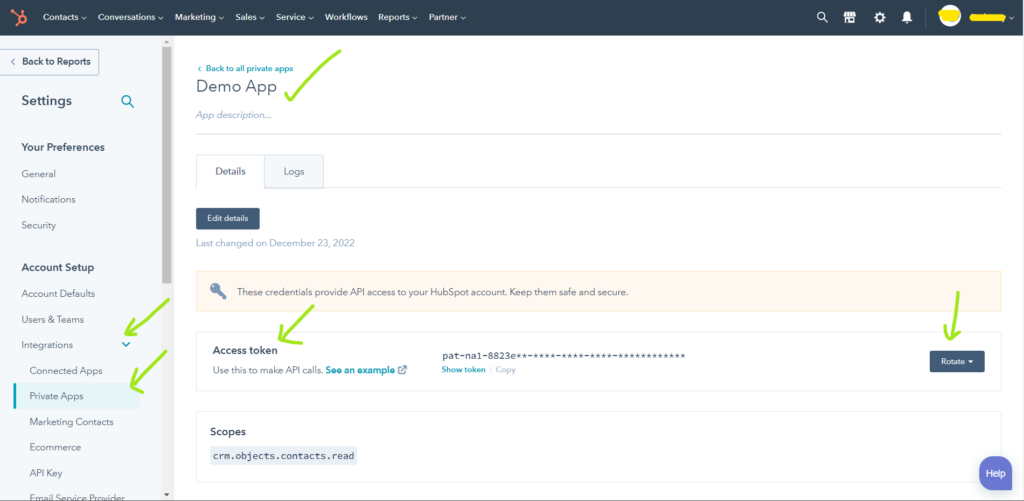
In case you have clicked “Skip for now”, you can find your private app access token on the main app page. Refer to the below image.
As I mentioned above, the private app access token does not have an expiry but HubSpot does provide you with an option to manually rotate the access token. You can see the “Rotate” option in the image below.
3. Test the Access Token by making a HubSpot contact API call
In this step, we will go through a python code to make a HubSpot API call using Hubspot private app access token. I named below the python file hubspot_contact_api_call.py, you can name it as you want.
I’m not going to explain the code line by line. But kindly try to understand the code, that will help you build on top of the below code to make it more advanced. You can refer to Python Code to get Contact data from HubSpot using HubSpot Contact API.
#!/usr/local/bin/python3
# command to run this code $ python3 ./hubspot_contact_api_call.py
import sys
import json
import requests
import pandas as pd


def get_recent_created_hubspot_contact(private_access_token):
    try:
        count = 10
        url = f'''https://api.hubapi.com/contacts/v1/lists/all/contacts/recent?count={count}'''

        headers = {"Authorization": "Bearer "+private_access_token}

        result = requests.get(url = url, headers = headers)

        response_dict = json.loads(result.text)

        contacts = response_dict["contacts"]
        contact_vid_df = pd.DataFrame(contacts,columns=['vid'])

        print("\n Function get_recent_created_hubspot_contact successfully\n")

        return contact_vid_df
    except:
        print("\n Function get_recent_created_hubspot_contact Failed : ",sys.exc_info())


if __name__ == '__main__':
    try:
        print("\n Hubspot Contact API first call")

        access_token = "replace with your hubspot private app access token"

        contacts = get_recent_created_hubspot_contact(access_token)
        print(contacts)

        print("\n Hubspot Contact first call \n")
    except:
        print("\n Hubspot Contact first call ", sys.exc_info())
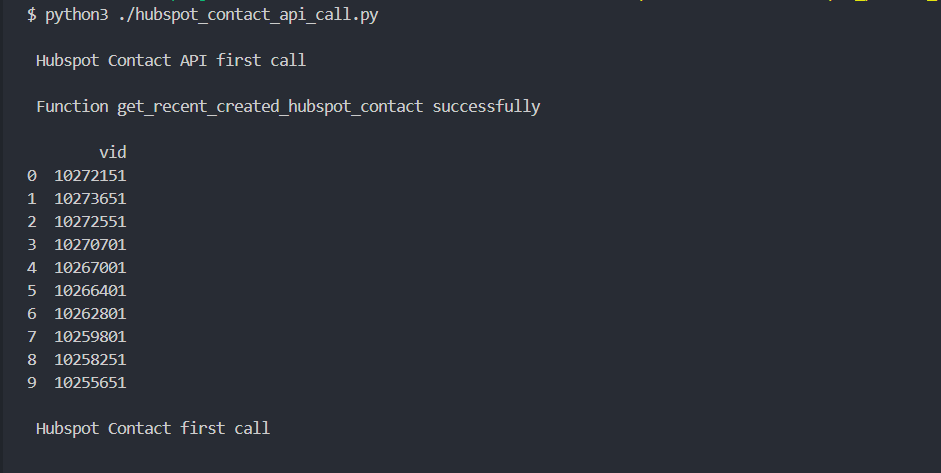
You run the above file by using the command python3 ./hubspot_contact_api_call.py. You should see 10 contact IDs printed in your console in panda’s table format.
Congratulations! You have successfully created HubSpot private app and generated tokens to make Hubspot API calls. Hope I have made the entire process of creating a HubSpot private app and generating tokens using the private app easy and understandable.
If this blog was able to help you in any way, support me by sharing it with your friends and connection. Thank you! see you soon.
If you have any questions or comments feel free to reach me at.
Checkout out my other API Integration and Coding Solution Guide